Showing posts with label Milliput. Show all posts

Saturday, 14 April 2012

Nurgle Lord Conversion


I have had the fantastic Brian Nelson plastic Nurgle Lord model from Games Workshop sitting on my painting desk for a few months now, partially assembled and waiting for some attention. The problem was, I knew I wanted to convert him - I can't seem to not convert a model these days - but I didn't know what I wanted to do to him and was hesitant to start cutting him up only to regret it.

Anyway, I had some extra time off from work over the Easter weekend last week and I decided to just sit down and work on some models since I had been in a bit of a lull of late. Shrugging off my earlier hesitations, I decided to start working on the Nurgle Lord figure, despite the absence of a clear idea in my head for how the finished piece should look.

While this is quite unusual for me, the process was quite liberating as I wasn't frustrating myself by trying to work too precisely towards an image in my head.

The end result of a few hours work is what you can see below. I clipped off the horns on the shoulder pad and turned them into disease ridden pustules. I added the crow from the Empire General kit, with a little conversion and tidying up, to return some height and attention to the area and also to create some visual lines through what is otherwise quite a 2D pose.

The head received the most sculpting work to create a hideous face, half covered by a helmet with horn bursting through. The rest of the work composed of adding some rivet detail to flat armour plates (rivets always catch rust well so they would help work some contrast in when it came time to paint) and to tidy up areas of soft detail due to the limitations of plastic casting.

All in all, I am pretty pleased with how he has turned out. While not radically different from the original sculpt (I don't think he needed to be anyway - the original is was an instant classic) he is different enough to be unique, which is what I was going for.

I used a mix of ProCreate and Milliput putties (about 50:50) for the face/helmet sculpting, ProCreate on its own for the horn and Milliput for the armour plate fixes.


All in, not bad for a few hours work I think. I will be painting him up in the coming weeks. I picked up a few of the new GW paints to test them out so will try to provide my thoughts on these two in the next few posts as I work on the model.

As usual, feel free to let me know your thoughts in the comments below.

Sunday, 24 April 2011

Why I Hate Metal Mini's + On The Workbench


I hate metal miniatures. There is nothing more frustratingly time consuming than preparing a metal miniature for painting.

With resin and plastic you can remove mould lines, flash and imperfections relatively quickly with a scalpel and files/sand paper. With metals though, it not only takes much longer to remove these, since the material is much stronger and more brittle, but you also have to put up with pitting on almost all surfaces.

Yes, sometimes resin miniatures get spots where the finish is a little rough and pitted, but with metals it tends to be all over the figure. Very annoying!

There is a couple of ways to deal with this:


Sanding

Sanding pitted and rough surfaces with fine grit wet/dry paper (starting with 800 and finishing with 1000+) is a good starting point for cleaning up the surfaces of a metal miniature. For tighter nooks and crannies, you can cut small strips and glue them to pieces of wire or cocktail sticks to get in at them.

However, sanding will only go so far to clean up a metal miniature. Often the pitting involves both raised bumps and recesses, so unless you want to spend forever sanding a couple of mm off the entire model, you are going to need to do some filling too...


Milliput


Milliput is a two part epoxy putty that is water soluble, meaning it can be diluted to create a milky solution that can be applied with a brush and used to fill small recesses. Larger mould shift line recesses can also be filled with it as, while still fresh, it can be worked into shape and smoothed flush with the mini. It can then be filed to a smooth finish once cured. The only downfall is that it takes a couple of hours to fully cure and can take a while to ensure all gaps have been filled flush.


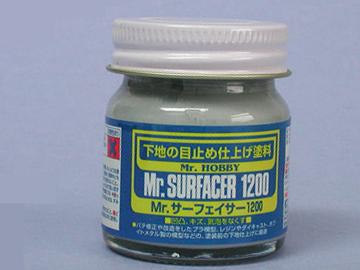
Mr Surfacer

Mr Surfacer comes as a grey liquid in a jar which cures in about 15 minutes to a plastic like finish. It can be applied neat from the jar to fill bigger gaps, or thinned (using Mr Colour Thinner) to create a more fluid mixture which can be painted on to fill smaller, shallower recesses. Mr Surfacer (1000 or 1200) can also be thinned and used as a primer through an airbrush, leaving a smooth finish.


One of the main benefits of this product is that no sanding is necessary on the finish as it is self levelling. Of course, if you aren't covering the entire surface, you will likely still have a small seam where the edge of the dried Mr Surfacer meets the metal surface of the model. In these instances, some light sanding with wet dry will be all that's needed.


On the Workbench

Why this outburst of hatred towards metal miniatures? Well, recently I decided to start working on an Inquisitor scale Eversor Assassin miniature from Games Workshop which I've had lying around since last year.


A nice sculpt, though with a horrendous amount of mould lines, mould shift, flash and pitting. The armour plating in particular required a lot of work to get it back to it's smooth shapes and hard edges. I also chose to remove all of the protruding injector type things from the armour plates. Partly to allow me to get them smooth and in shape again, partly because they were badly cast and would have required a lot of work to get back to their intended state and partly because I just think it looks cooler and more fitting of a sleek, deadly assassin.

All in all, I've spent about 3 days on and off just cleaning this miniature up and re-sculpting, detailing and filling areas to get it ready for paint.

Urgh!