Showing posts with label modelling. Show all posts

Saturday, 14 January 2012

Check These Out...


So 2011 is in the books and all in, despite the fact I only painted 3 models in the entire year (I know...), it was a pretty good year for the blog. There were 21 posts in 2011 with a good mix of tips, tutorials and reviews but I want to do even more in 2012.

But enough about my blog for now. For this post I want to share with you all a few blogs and sites I have found recently that I would strongly recommend you check out.


Sproket's Small World

Sproket's Small World is the blog of former Golden Demon UK Slayer Sword winner David Soper. David is an extremely talented painter and converter with a bit of a "modern classic" style. While his blog is fairly new at only 6 months old, he has already shared a number of excellent step by step tutorials and tips, making this blog well worth a look. Check out his tutorial on painting Dark Eldar Scourge wings - brilliant and makes it looks so simple!


RuneCast Blog

RuneCast Blog is the blog of the almost sickeningly talented Gregor - a freelance miniature sculptor combining a blend of classic marauder miniatures style with more modern 40k sculpt style. In particular check out his conversion work on a Black Templars Contemptor dreadnought and his Dwarves. Cracking stuff!


Fantasygames

Fantasygames is not only one of the slickest designed hobby blogs/sites around, but also the home of a talented group of Polish painters. While mostly a place to display finished models there are the occasional WIP posts and some innovative ideas on show. Be sure to check out "The Puppet Master" diorama - really cool magic effects going on there.


So there you go, three great blogs to kick start your 2012 with!

Saturday, 16 October 2010

Golden Demon 2010 - It's Been A While...

Phew!

As you may (or may not!) have noticed, I haven't been particularly active on the blogging front in the last few months - for that, I apologise.

With work, real life commitments and general hobby indecision, I haven't actually done a whole lot in modelling and painting terms in the interim either! Lots of small projects started and then shelved in quick succession for various reasons.


Games Day UK 2010


Fortunately, Games Day UK 2010 took place a couple of weeks ago and after promising myself for the last 3 years I would attend and finally enter a GD, myself and my incredibly supportive girlfriend made the trip down to Birmingham for a day of hobby filled activity (that and we were flying out to Singapore the day after from London - I suspect this was a major contributing factor in our attending!).

So with the day fast approaching and nothing new to take to it, I begun working on a Kislevite warrior on foot sculpt for the Fantasy Single Miniature category.


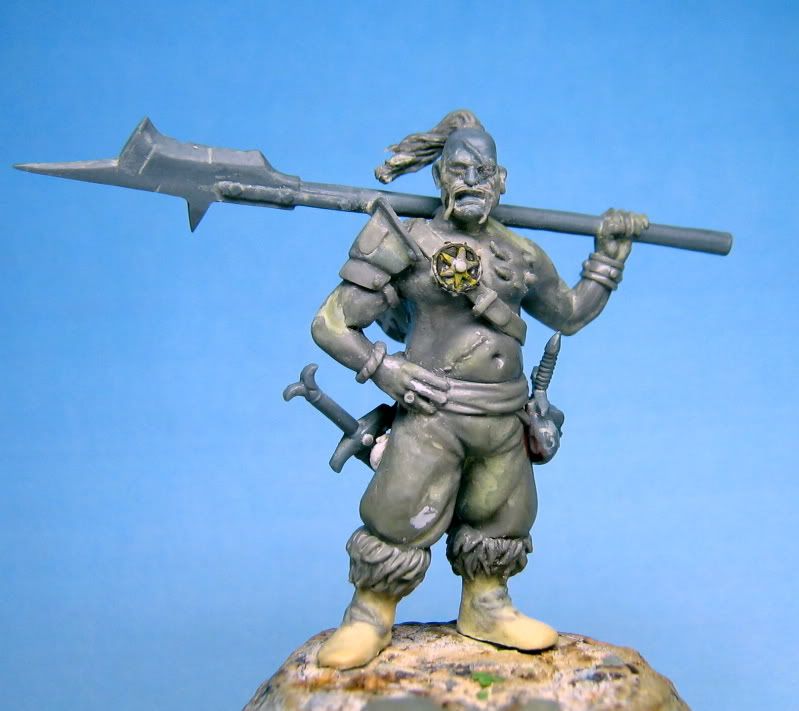
I spent about 3 weeks working on the sculpt (using ProCreate and a Fimo core, with a few GW parts), probably too long over too short a period in retrospect as, by the time it came to painting it, I had begun to notice a number of annoying flaws which totally destroyed my motivation, leading me to shelve the project.
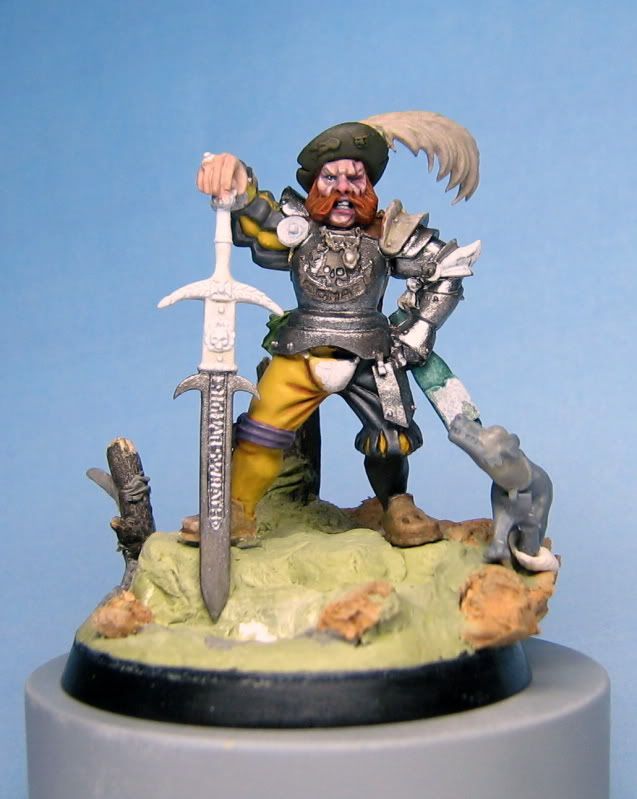

Fantasy Single Entry

Fortunately I had to hand an Empire Captain figure (the direct only one with the big mace) which caught my attention. A few small conversions and a freshly sculpted hat later and it was time to paint!

A lot of thought went towards colour schemes, basing, composition of "the piece" etc and I owe a lot to the fine folks at Darkwald for their thoughts and feedback. In the end I settled for an Averland scheme as it was iconic of the Empire, a striking scheme and allowed some creativity with the opulence of his attire and equipment.

The sculpt itself is actually one of my recent favourites. I've seen it heavily criticised by a number of people on forums, but I think they fail to see it's "classic GW" charm, coupled with the fine details and character of the pose and face.

I had always intended to use a 40mm base, even when considering the 
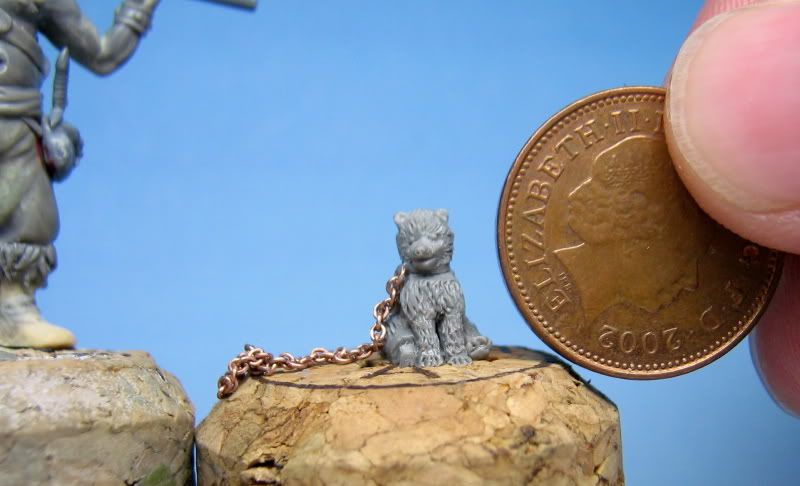
Kislevite, it simply offers more room to convey a scene with. However, the extra space can also look too much for such small figures so I had also always intended to include a companion figure - with the Kislevite this was going to be the small bear I had sculpted (pictured below). It added even more iconography and character so was an obvious choice. With the new piece however, there was no obvious choice for "companion" that was feasible in size (it is "Single Figure" after all!).


In the end I stumbled across the dog from the Bretonnian Men At Arms set. I had seen this used before in one of Joe Hills gold Fantasy Single entries from a few years back, so I was comfortable it was safe to use. However, the stock part on it's own didn't really work for me. It didn't look linked to the figure in anyway due to both it's pose and the lack of physical attachment (Joe's was on a leash). Therefore I altered the head (fixing the position of the eyes in the process) so that the dog would be looking to his master, a convenient trick which also helped draw the eye of the viewer towards the desired centrepiece of the figure - the captains face (see the early stage WIP pic below).


Managing to finish just 2 days before the event (though I had also intended to add a design to the shield freehand on the leg but ran out of time) I decided to take my Cadian Guardsman and Ghorros Warhoof (pics in previous post) to enter into 40K Single and Fantasy Monster respectively.


On The Day

On the day I managed to make finalist with all three entries, even having my Fantasy Single Entry displayed on the big screens during the day for about 5-10 minutes! This made me very happy, but fortunately there was more in store!

Watching the judging for the Fantasy Single was both interesting, exciting and nerve wracking in equal measures. In the end, my entry was pushed into 4th (last one cut from top 3) by some very nice pieces. I was later told by one of the judges that it had been considered for Bronze but the fact the Gold and Silver winning pieces were both Empire figures also counted against it - somewhat disappointing, though I can understand why (people read too much into the "types" of figures which place the previous year when planning GD entries!) - in the end, I was just happy to have been in contention for a place in the busiest category (40 odd finalists compared to just 12 for 40k Single) on my first time entering! *Pics of my finished entry below care of www.sodemons.com - don't have my own yet!


My feelings were then given a massive boost when, whilst hunting for my Ghorros Warhoof to collect from the finalist cabinets, I found I had won Bronze in Fantasy Monster with him - quite unexpected as this was also a highly contested category and mine was one of few "stock" entries.

There has been a lot of negative talk online after the event from a number of disgruntled parties over the judging, the way the event is run, what was on show etc, however I find myself disagreeing with almost all of it entirely.

Every year there are gripes that a particular painting style is "destined" to win where others are specifically singled out and prejudiced against - a quick look at the winning figures would suggest otherwise to me. This kind of hyper-competitive attitude saddens me to see, however I won't go further into it here.

All in all, I had a great day. I got to meet some great people whom I have spoken with online for some time and who's work I highly respect in person at last (Jakob Nielsen, Darren Latham, Mark Tait among others), got to see some cool studio stuff, got to see LOADS of great miniatures and best of all, achieved a childhood dream (sad I know) of claiming a Golden Demon!

More pics and posts soon I promise!

Saturday, 16 January 2010

Something In The Air - Airbush Inbound!

With a desire to expand my modelling and painting skill set, and also add a fun new tool to my collection, I recently purchased an airbrush and compressor with air tank (well, I say recently, but actually I bought it before New Year and it still hasn't arrived yet!).

Having seen the works of hobbyists such as Julien Casses and Mathieu Fontaine and the wonderful effects and finished they achieve using an airbrush, I want to have a go at producing similarly smooth finishes and flawless blends!

As I've never even held an airbrush before though, I felt it was necessary to do a bit of research on them in order to find out about basic things such as maintenance, set-up, paint thickness etc, as well as learning more about some of the effects that can be achieved. With this in mind I picked up the books "Airbrushing and Finishing Scale Models (Modelling Masterclass)" by Brett Green and "Air Brush Painting Techniques: 6 (Compendium Modelling Manuals)" from Osprey.

Airbrushing and Finishing Scale Models (Modelling Masterclass)

Both were good value for money, with "Airbrushing and Finishing Scale Models" probably the better of the two due to the more comprehensive look at the tool and its applications, however the Osprey book includes some good examples of using templates etc making it worth a look for the price too (about £7 from Amazon).

Air Brush Painting Techniques: 6 (Compendium Modelling Manuals)

I'll be sure to keep you all posted with my experimentation with my airbrush when it arrives. I've got a nice new Valkyrie kit (courtesy of my amazing girlfriend!) that is just dying to get some airbrush treatment!

In the meantime, back to learning how to take care of it to make sure it lasts!

Saturday, 5 December 2009

Warhammer (etc) Figure Sculpting Tutorial - The Basics

Realised I never posted this here. Had originally done the tutorial for my good friend Grey_Death over at The Painting Corp (great blog, go check it out if you haven't already!), but thought I'd re-post here for completeness sake seeing as I'm trying to catalogue tutorials here.


Following his recent acquisition of some clay shapers, coupled with his first forays into sculpting with Green Stuff, Grey_Death was kind enough to ask me to contribute a tutorial or two on sculpting. Having never written a proper tutorial before, I hope you will all forgive the inevitable mistakes I will make along the way!

This tutorial will cover some old ground and hopefully a few new insights as well. First, the old ground:

Tools

There are a few core sculpting tools that all sculptors should have. Below is a list of the tools I use along with their uses (See image 1. below).

  • 1. Pin Vice - Used to drill holes for pinning and creating holes (for mesh, gun barrels etc).
  • 2. Jewelers Files - Nice, small files for filing down plastic/resin/metal/cured putty. Good for making sharp edges in cured putty.
  • 3. Clay Shapers - Used to shape putty and smooth surfaces. I mainly use the white chisel headed one to do most of the shaping and smoothing, with the bullet headed one being used for concave shapes and creating folds etc.
  • 4. Metal Sculpting Tools - These are from a cheap Gale Force 9 set. The tool with a half round on one end and a blade on the other gets used a lot to blend putty into other surfaces (cured putty/resin/metal/plastic etc). The pointed tool is used to create fine details and small holes, hair, rips etc.
  • 5. Scalpel - Used to cut plastic/resin/cured putty into shape and to remove any excess putty.
  • 6. Paper Clips - Used as pins for pinning figures and as armatures for sculpting over.


Above is also a list of a selection of putties I use for sculpting (Image 2.):

  • 1. Fimo (Champagne) - I haven't actually used this yet, but it comes highly recommended. A good material to practice with as it doesn't cure unless baked. When working with it, keep your work sealed in a jar in a shaded area to avoid any dust getting on the putty, or any accidental smudging.
  • 2. Green Stuff - The putty of choice for most sculptors. A 2 part epoxy resin that requires mixing before use. Can be mixed in different ratios in order to achieve a variety of sculpting times. The more yellow, the softer the mix will be and the longer the curing time, the more blue, the harder the mix will be and a shorter curing time. Knead thoroughly to ensure no lumps of yellow or blue otherwise they will ruin the finish as they won't cure properly.
  • 3. Brown Stuff - Like Green Stuff, but a much firmer putty and more solid when cured, making it better for doing hard edged surfaces and mechanical parts.
  • 4. Milliput - Super Fine - Used to bulk work on bases and also for making "Milliput washes" (milliput mixed with water), which are used to fill small impurities in resin and metal sufaces, and also in putty work. Washes can also be used in a thicker mix to fill small gaps and seams in sculpting and conversion work.
  • 5. 1200 Grit Wet Dry Paper - Not a putty, but another tool used in conjunction with the putty. Used to sand surfaces to get a super smooth finish. I tend to sand all surfaces with this before painting in order to have a perfect surface to paint over. When sculpting, it can be used to sand out and seams and get a flush surface between putty and plastic/resin/metal/cured putty.

Now that, that is out of the road, on with the sculpting!

The Subject

The subject for this tutorial is a Victrix plastic Napoleonic Frenchman (example 1. below) which I am converting into a Rogue Trader. As the Victrix figures are a good deal smaller and thinner than Games Workshop's plastic figures, I will be using Green Stuff to bulk the figure out and to sculpt new feet in order to add some height to the figure.


The Sculpting

As can be seen in example 2 above, I have started by creating a rough base shape to work over for the feet. This was created by removing the original figures feet and putting two paper clip pins into the legs, running all the way down into the cork base. The rough shape of the feet was then built up over the paper clips and left to cure overnight. I always use a cork as a holder for sculpting projects as it is easy to push the pinned feet of models into, providing a nice large surface to hold onto that keeps your fingers away from the putty while you work on it. Champagne corks are best as they are nice and wide and have a nice flat, wide base to provide a stable surface for your work to stand on when you leave it to cure.


Putty is then added to the base work (See example 1 above) in order to add volume to the shape along with some basic details. The putty is then shaped and smoothed to form the shape of a booted foot (See example 2 above). No folds or creases are added on the boot at this stage as I find it easier to add these seperately once the shape is formed and cured. Where the freshly applied putty meets cured putty from the previous stage, the edges are smoothed into the previous layer using the half round end of the metal sculpting tool (See example 3 above). This is done with the metal tool as clay shapers aren't hard enough to press the putty flush, therefore leaving a fine seam that can show up in painting. The result of the smoothing with the metal tool can be seen in image (See example 4 above).


I began bulking out the legs, applying putty to one area at a time in order to provide room to work (1). The edges were smoothed with a metal tool before the bullet tipped clay shaper was used to add some folds around the knee and groin (See example 2 above and 1 below).


There are a few small imperfections in the putty on the thighs (See example 1 above), these will be filled with a milliput wash later and then sanded smooth. Putty was then applied to bulk out the jacket, pressed on into shape first with fingers (See example 2 above). The putty was then shaped as above, using the chisel tool to shape and smooth, the metal half round to smooth the edges into the plastic, and the bullet tool to create some light folds (See example 3 above).


As you can see, there is still a lot of work to do before the figure is finished, there is still a fair bit of shaping and volume to be added, along with the all important details, however these will be covered at a later time in a future tutorial on sculpting details.

Thanks again to Grey_Death for the opportunity, and thank you for reading. I hope that whether you are just starting out at sculpting, or if you have been sculpting for a while now, you will have picked up something of use here.

Cheers,

Dante

Wednesday, 2 December 2009

Worth A Look

Just a quick blog post this one. Just wanted to point out some great blogs well worth a look. I know I've been admiring the work on them lately:

First up:- Little Green Monsters - Some truly amazing sculpt work on show from this man and sound advice about tools and putty mixes too, check it out!

Secondly:- The Painting Corp - Amazing collection of tips, tutorials and advice on all things modelling. The frequency of updates mean there is always something new to read and the community around the blog ensures valued discussion. Run exceptionally well by some great guys.

Thirdly:- Dave Taylor Miniatures - Great guy and a fantastic modeller. His production rate is so high that in the space of a week he will have finished a new army in time for the next post! His blog also seems to send a lot of traffic my way, so thanks for that Dave!


There are a load more sites and blogs I intend to add to this at some point, these are just the ones I've been admiring lately, so go on, check them out!