Friday 18 December 2009

How To Paint Chipped Armour Tutorial


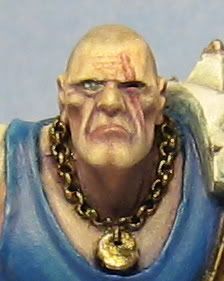
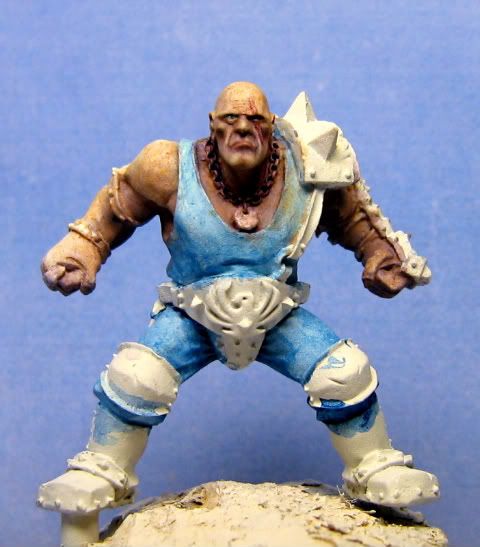
Had a couple of people ask how I did the chipped armour effect on this chap (above), so I have decided to put together another tutorial on this subject.

Chipped armour effects and other painted texture effects, also sometimes referred to as trompe l'oeil (French for "trick of the eye") can sometimes be tricky to get looking right, especially on white or black backgrounds due to a difficulty in creating the necessary contrast or definition for the effect to work.

There are two main ways of achieving the appearance of realistic chips and scratches on painted surfaces:
  • Sponge - Applying the "chipping" colour using a piece of sponge or blister foam.

  • Liquid Latex Mask - Applying liquid latex mask (Vallejo being my personal preference) to a surface painted with the desired "chipping" colour, before covering the entire surface with the overall desired colour and then gently removing the liquid mask with an eraser of cloth to reveal the chips.
Both techniques are fairly easy to do, with the sponge method undoubtably the easier and quicker of the two, yet I find it best to use a mixture of both to get a good variation in the size of and randomness of the chips.

The following tutorial looks at the sponge method, however the liquid latex technique is fairly similar in terms of application. So without further preamble, lets get down to it!

Prepare the Surface

The first step in the process is rather obviously to prepare the surface the chips will be applied to. In this example, the chips are being applied over a white surface, which requires a little extra thought.

Rather than simply applying the chipping to a perfect white surface, the white needs to be shaded a little first in order for the effect to work properly when it comes time to highlight the edges of the chips, but more on that later.

In this instance, the white was shaded with a mix of a touch of a heavily thinned touch of Vallejo Basalt Grey and Games Workshop Asurmen Blue wash (not very visible in the pic).


Let the Sponging Commence!

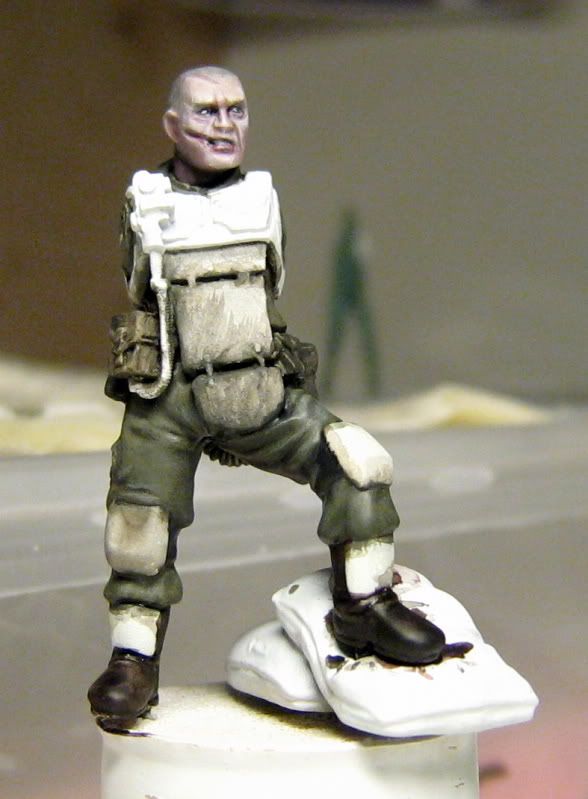
Arming yourself with some sponge or blister foam (blister foam is free and a good size for the job!), choose an appropriate colour for your chips, bearing in mind that strong contrast, but not "too" strong is what we are after. For this example, I'm using GW Charadon Granite, a nice dark grey/green/brown which fits well with the fatigues on the figure.


When applying, get some paint on the sponge, then dab it against a piece of tissue to remove any excess paint that would spoil the effect, then lightly apply focusing on the edges of armour plates and areas that would receive natural wear and tear.

As you can see in the pic above, it can be a bit of a messy effect, so consider applying the chips before finishing the surrounding areas.

Edging

Now that the chips have been applied, it's time to work on making them look realistic and creating the "trick of the eye". To do this, we need to start applying some simple lighting effects to the chips.

To do this, mix some black with the chip colour from earlier and using a fine detail brush, apply some of this colour in a thin line around the top (relative to the direction light would be falling) inside edge of the chip to simulate shadow from the lip formed by the layer of paint that has been chipped away.

Next, apply a thin line of white (or white mixed with your overall surface colour) to the bottom outside edge of the chip. This simulates light catching the raised edge of the paint where it meets the chip, adding to the realism.


To go one step further, you could fill in some of the larger chips with some metallic paint (GW Mithril Silver being my preference) to get the look of chips and scratches going right through both paint and primer to expose the bare metal of armour plates.

Thats pretty much it. As I said, easy and quick to do!

Saturday 5 December 2009

Warhammer (etc) Figure Sculpting Tutorial - The Basics

Realised I never posted this here. Had originally done the tutorial for my good friend Grey_Death over at The Painting Corp (great blog, go check it out if you haven't already!), but thought I'd re-post here for completeness sake seeing as I'm trying to catalogue tutorials here.


Following his recent acquisition of some clay shapers, coupled with his first forays into sculpting with Green Stuff, Grey_Death was kind enough to ask me to contribute a tutorial or two on sculpting. Having never written a proper tutorial before, I hope you will all forgive the inevitable mistakes I will make along the way!

This tutorial will cover some old ground and hopefully a few new insights as well. First, the old ground:

Tools

There are a few core sculpting tools that all sculptors should have. Below is a list of the tools I use along with their uses (See image 1. below).

  • 1. Pin Vice - Used to drill holes for pinning and creating holes (for mesh, gun barrels etc).
  • 2. Jewelers Files - Nice, small files for filing down plastic/resin/metal/cured putty. Good for making sharp edges in cured putty.
  • 3. Clay Shapers - Used to shape putty and smooth surfaces. I mainly use the white chisel headed one to do most of the shaping and smoothing, with the bullet headed one being used for concave shapes and creating folds etc.
  • 4. Metal Sculpting Tools - These are from a cheap Gale Force 9 set. The tool with a half round on one end and a blade on the other gets used a lot to blend putty into other surfaces (cured putty/resin/metal/plastic etc). The pointed tool is used to create fine details and small holes, hair, rips etc.
  • 5. Scalpel - Used to cut plastic/resin/cured putty into shape and to remove any excess putty.
  • 6. Paper Clips - Used as pins for pinning figures and as armatures for sculpting over.


Above is also a list of a selection of putties I use for sculpting (Image 2.):

  • 1. Fimo (Champagne) - I haven't actually used this yet, but it comes highly recommended. A good material to practice with as it doesn't cure unless baked. When working with it, keep your work sealed in a jar in a shaded area to avoid any dust getting on the putty, or any accidental smudging.
  • 2. Green Stuff - The putty of choice for most sculptors. A 2 part epoxy resin that requires mixing before use. Can be mixed in different ratios in order to achieve a variety of sculpting times. The more yellow, the softer the mix will be and the longer the curing time, the more blue, the harder the mix will be and a shorter curing time. Knead thoroughly to ensure no lumps of yellow or blue otherwise they will ruin the finish as they won't cure properly.
  • 3. Brown Stuff - Like Green Stuff, but a much firmer putty and more solid when cured, making it better for doing hard edged surfaces and mechanical parts.
  • 4. Milliput - Super Fine - Used to bulk work on bases and also for making "Milliput washes" (milliput mixed with water), which are used to fill small impurities in resin and metal sufaces, and also in putty work. Washes can also be used in a thicker mix to fill small gaps and seams in sculpting and conversion work.
  • 5. 1200 Grit Wet Dry Paper - Not a putty, but another tool used in conjunction with the putty. Used to sand surfaces to get a super smooth finish. I tend to sand all surfaces with this before painting in order to have a perfect surface to paint over. When sculpting, it can be used to sand out and seams and get a flush surface between putty and plastic/resin/metal/cured putty.

Now that, that is out of the road, on with the sculpting!

The Subject

The subject for this tutorial is a Victrix plastic Napoleonic Frenchman (example 1. below) which I am converting into a Rogue Trader. As the Victrix figures are a good deal smaller and thinner than Games Workshop's plastic figures, I will be using Green Stuff to bulk the figure out and to sculpt new feet in order to add some height to the figure.


The Sculpting

As can be seen in example 2 above, I have started by creating a rough base shape to work over for the feet. This was created by removing the original figures feet and putting two paper clip pins into the legs, running all the way down into the cork base. The rough shape of the feet was then built up over the paper clips and left to cure overnight. I always use a cork as a holder for sculpting projects as it is easy to push the pinned feet of models into, providing a nice large surface to hold onto that keeps your fingers away from the putty while you work on it. Champagne corks are best as they are nice and wide and have a nice flat, wide base to provide a stable surface for your work to stand on when you leave it to cure.


Putty is then added to the base work (See example 1 above) in order to add volume to the shape along with some basic details. The putty is then shaped and smoothed to form the shape of a booted foot (See example 2 above). No folds or creases are added on the boot at this stage as I find it easier to add these seperately once the shape is formed and cured. Where the freshly applied putty meets cured putty from the previous stage, the edges are smoothed into the previous layer using the half round end of the metal sculpting tool (See example 3 above). This is done with the metal tool as clay shapers aren't hard enough to press the putty flush, therefore leaving a fine seam that can show up in painting. The result of the smoothing with the metal tool can be seen in image (See example 4 above).


I began bulking out the legs, applying putty to one area at a time in order to provide room to work (1). The edges were smoothed with a metal tool before the bullet tipped clay shaper was used to add some folds around the knee and groin (See example 2 above and 1 below).


There are a few small imperfections in the putty on the thighs (See example 1 above), these will be filled with a milliput wash later and then sanded smooth. Putty was then applied to bulk out the jacket, pressed on into shape first with fingers (See example 2 above). The putty was then shaped as above, using the chisel tool to shape and smooth, the metal half round to smooth the edges into the plastic, and the bullet tool to create some light folds (See example 3 above).


As you can see, there is still a lot of work to do before the figure is finished, there is still a fair bit of shaping and volume to be added, along with the all important details, however these will be covered at a later time in a future tutorial on sculpting details.

Thanks again to Grey_Death for the opportunity, and thank you for reading. I hope that whether you are just starting out at sculpting, or if you have been sculpting for a while now, you will have picked up something of use here.

Cheers,

Dante

Wednesday 2 December 2009

Worth A Look

Just a quick blog post this one. Just wanted to point out some great blogs well worth a look. I know I've been admiring the work on them lately:

First up:- Little Green Monsters - Some truly amazing sculpt work on show from this man and sound advice about tools and putty mixes too, check it out!

Secondly:- The Painting Corp - Amazing collection of tips, tutorials and advice on all things modelling. The frequency of updates mean there is always something new to read and the community around the blog ensures valued discussion. Run exceptionally well by some great guys.

Thirdly:- Dave Taylor Miniatures - Great guy and a fantastic modeller. His production rate is so high that in the space of a week he will have finished a new army in time for the next post! His blog also seems to send a lot of traffic my way, so thanks for that Dave!


There are a load more sites and blogs I intend to add to this at some point, these are just the ones I've been admiring lately, so go on, check them out!

Saturday 21 November 2009

The Eye's Have It - How To Paint Eyes On Miniatures


Recently I was asked by Hushrong, a fellow member of the Painting and Modelling forums on Warseer:

can i ask what kind of brush you use for the close detail? i have the fine detail brush from citadel since it was the smallest one i could find but is that good enough for doing eyes?
It's a good question as a lot of folks struggle to find a brush that's right for them for doing fine detail work such as eyes, leading some to simply leave the eyes of a model un-painted, or resulting in the "thousand yard stare" of an intensely frayed veteran who's seen one too many armour saves come up 1!

If your having similar problems yourself, don't feel down, everyone starts out much like this, it's simply a case of developing good brush control, through practice, to enable you to get the paint in the right place, and using the right equipment for the job.

Personally, I use W&N series 7 brushes for my detail work (size 000 for eyes, size 00 for most other stuff). W&N brushes are considered some of the top brushes and really are deserving of this title as they maintain a perfect point (with proper care) for a long time (I've had mine since January and they're still like new).


For eyes, the other thing I have found is that white and black are both colours that can dry out quickly on the brush when in the small quantities required for such small detail work. Therefore, for the last few months I've been using W&N Flow Improver. This stuff basically makes the paint go on so much easier and with so much more control, without diluting the strength of the colour (like water would), and without making the colour take forever to dry (like drying retarder would).

It's also good stuff for any awkward colours and for freehand. Best of all, you get a pretty big bottle which lasts a long time.....unless you spill some of it on your desk a day after getting it (doh!:o).

When I paint eyes, I find as large a part of the process as any is simple patience. Regularly I will rework the eyes 2 to 3 times before I have them just right.

Also, you will want to think about at what stage you paint them in relation to the areas around them, most commonly the rest of the skin on the face, but sometimes masks, helmets etc can get pretty close, within "splash range" (where you might slip and fudge up the adjoining area). Typically, I like to paint the eyes in after I have reached a mid point in painting the flesh of the face. This way, if you do mess up a bit when putting the colours for the eyes in, you don't have as many layers of colour to re-do.

The process I use for painting eyes is:

  1. Paint the sockets with a very dark brown, almost black, but not totally black as this can look a little unrealistic. The hint of brown takes the edge off a bit and makes them fit better with the flesh of the face. For me, this will typically be a mix of GW Scorched Brown and Vallejo Black, but any mix to make an almost black brown will be fine. Think of this step as eventually representing the eye lashes of the eye.

  2. Paint the whites of the eyes in using an off white, being careful to leave a thin line of the above step around the edges of the socket. I use P3 Menoth White highlight (a creamy white), but again, any will suffice. The reason for using off white is for the same reason we didn't use pure black above. Real eyes aren't brilliant white anyway so it adds to the realism.You can play about here if you are so inclined, and depending on the model, to get different expressions. By leaving more of a top "eye lash" line on a female model, you can simulate make up and a sultry appearance.

  3. Finally, add the pupils with a very dark grey, again, almost but not quite black. For this I use Vallejo Dark Grey mixed with a tiny amount of Vallejo Black. When applying, try to keep the pupils equally positioned on the eyes, both pointing in the same direction. To make the eyes really pop, I like to add a tiny highlight to the pupils (if possible depending on the figure) with a tiny dot of a slightly lighter grey (normally Dark Grey on it's own, sometimes with a little Basalt Grey mixed in).

That's pretty much it! Again, don't be afraid to go back and re-work things to get them right. I normally find it takes a few attempts to get things like both the pupils looking equidistant and in the same direction.

Have fun!

Wednesday 18 November 2009

Modern Warfare....


Ok, I managed to tear myself away from MW2 for long enough after recovering from illness to do some more on this chap.

I've pretty much finished the body now and have built and started painting the base. At the moment the base isn't even a third of the way done so try to imagine it with some foliage and snow!

Next up - the arms and finishing the base and weathering on the legs!

Cheers,

Dante

Saturday 7 November 2009

Fleshing Things Out - Flesh Painting Tutorial

About time I added another post here!

As you can no doubt tell from the dodgy pun of the title (sorry!), this post is concerned with the method I use to paint human flesh.


I've received a lot of questions on forums lately asking me about the recipe's and methods I use to paint flesh (specifically caucasian flesh), so I thought rather than reply every time with the same response, I would put together a short (text heavy for the time being - not had a chance to do step by step pics yet) tutorial.

Prep Work

With any painting project, it is always worth doing some good preparation to ensure that you don't make any mistakes etc that you would have to correct later, or that could frustrate you/ruin the look of the finished figure.

The first thing worth doing when painting flesh is to look at reference pictures. Skin tone's vary from person to person, regions and climates. The picture below is a perfect example of this - notice that even among caucasian people, the tones can be quite different.


Paint Selection

While most paint manufacturors make "flesh" colours, and these can be good for painting armies in a quick fashion, often they are quite orangey, or pinkish in appearance, leading to an un-natural looking figure (for example the skin on my old ogre hunter below (2004), while nice enough, doesn't look very realistically human).


Therefore, for my current method of painting flesh, I like to look to other, more realistic looking tones for skin.

Base Colour

My current colour of choice as a base for all caucasian flesh is Games Workshop's Dheneb Stone paint from their foundation range. A nice "off-tan" colour, it also has the added benefits of great coverage, thins well and takes paint and washes over it very well.


Shades

The colours used for shading flesh go a long way to helping define the mood, character and overall look of your finished figure. Greener shades can be used to create sickly looking characters, while red and pink shades can help define a healthy, "softer" looking character.

While the shades I use for painting flesh are dependent upon the figure for the reasons outlined above, most commonly I use a mix of Vallejo Warlock Purple from their Game Colour range, and Charadon Granite, again from Games Workshop's foundation range, along with a little Dheneb Stone mixed in. The figure in the picture below has had the above mix applied over a Dheneb Stone base.


Toning

Beyond simply shading the flesh on your figure, it's also a good idea to add some toning in order to add a bit more interest to the skin. On the Cadian stormtrooper I'm working on at the moment for example (pictured at the start of this post), I have added some toning to the face using a mix of Baal Red and Devlan Mud washes from Games Workshop mixed with a little Vallejo Matt Medium (to remove the shine). The reason for this is that the figure will be set in a winter scene and I wanted a cold look to the face, hence the pink cheeks.

While this isn't an immediately noticeable effect that can be picked out on it's own, it adds considerably to the overall appearance of the mini. On Griff Oberwald's face (below) for example, toning was applied using a darker purpleish tone to make him appear aged.


Highlights

For highlights, as always it is simply a case of lightening the base colour. In this case, Dheneb Stone is first re-applied in a few thin coats to build a base for the highlights. Following this, P3 Menoth White is added to Dheneb Stone in increasing quantities for a few stages of highlighting. There is no definitive placements for highlights as it very much depends upon the figure, look you are aiming for etc, however as a general rule, the areas to focus upon are the brow, tip of the nose, tops of the cheeks and the tip of the chin.


Application

In order to replicate the translucent qualities of real human skin, the shades and highlights are best applied in very thin layers. Thin the paint until it is almost was like in consistency, get some on your brush, then dab the side of the brush lightly against a tissue a few times until most of the moisture is removed and then apply.

Hopefully that covers the main thrust of how I approach painting flesh. As with anything, there are many approaches that can be taken, this is the one that works for me, but you might find something else more suitable to your own style. Above all, don't be afraid to experiment with colours, tones and techniques to get the effect you desire.

Would love to hear your comments on your own experimentation and techniques for painting flesh.

Saturday 24 October 2009

New Stuff, New Models, New Approach

Ok, I've finally got round to posting something on here after creating this blog a few weeks back. I was inspired to create this by my good friend Aaron (Grey_Death over on Dakka Dakka) after contributing to The Painting Corp blog he runs with some friends.

I figure that, along with posting in the various modelling forums I'm a member of (Warseer, Dakka etc) I should probably create a place where I can collect all my thoughts, projects, reviews, tips etc in one place. So here it is! Hopefully in the coming weeks and months there will be plenty on here that might interest you whether your starting out in the hobby, or have been a part of it for a long time.

I've also created a Twitter account which I will be keeping up-to-date with shorter posts about what I'm up to that don't justify a blog post in their own right. Feel free to follow me and keep in touch using it, I'll be happy to follow back.

Right, now that's covered, onto explaining the "New Stuff, New Models" part of the title!

The past few weeks I have been working on an entry for the excellent Dakka Dakka "Nitty Gritty Armour" challenge. While the rules forbid me from saying what my entry will be at this point in time, I can tell you that I'm having more fun with it than I have with modelling in a quite a while! Just need to make sure I get it finished in time!

In order to help with that, I have been on a bit of a spending spree lately, picking up a number of military modelling books, along with a set of Winsor and Newton oil paints, some sansodor (odourless thinner), brushes (for oil paint use only) from ArtiFolk, and some Army Painter sand coloured spray and a selection of Vallejo model colour paints from the guys at Wargames Heaven. If your based in the UK, I'd recommend both for their range of products, competitive pricing and speed and quality of delivery (even with postal strikes over here!).

I'm really looking forward to testing out the oil paints as I've seen the effects that AFV (Armoured Fighting Vehicle) modellers achieve using them and they are truly astounding and so realistic!

I'll post my new reading list soon, along with a mini-review for each book.