Saturday, 28 May 2011

Citadel Finecast Review


If you frequent any hobby forums (Warseer, Dakka Dakka etc), visit the GW website regularly/receive their newsletter/read White Dwarf, then you probably can't fail to have noticed all the talk about Games Workshop's new Citadel Finecast range.


Citadel Finecast - Summary

If you are wondering what Finecast is, then to summarise, Games Workshop have decided to move away from casting character figures, monsters and elite units in white metal, instead opting for a new resin hybrid - the Citadel Finecast range.

In the first wave, there are around 120 Citadel Finecast kits, cast using the new resin. These include a range of the most popular figures previously cast in white metal for most armies, along with all the new character and elites/monster releases. The word is, all new models which would have previously been cast in metal will now be cast in the Finecast resin and the change will also sweep back through "most" of the existing miniatures still cast in metal.

What I've heard is that, as a metal figures stock expires, the decision will be looked at whether to cast it in the new resin, or just continue to cast it in metal, though I suspect resin to be more likely.


First Look

Anyway, with all the hype about today's big release of the Citadel Finecast range, I decided to pop down to Games Workshop Glasgow to have a look for myself and pick up a figure to experiment on.


The fact that the new range is cast in resin excited me from the moment I first heard about it. As regular readers will probably already be aware, I hate working with metal miniatures. Resin offers excellent conversion potential to a range of miniatures I previously would never have considered due to being easy to cut, carve and clean compared to metal.

While in store, I was given a look at a range of the new Citadel Finecast kits, large and small, and I have to say - I was very impressed with what I saw. The details were crisp and sharp, there was little flash and what there was is easily removed and the figures were very light and resilient (Steve the manager dropped a LOTR elf with bow from about 2 feet onto the table and it simply bounced - the bow, which was very thin, didn't even bend or break).

Best of all, because the material is so light, large kits which were once a pain to assemble when cast in metal (such as the Nurgle Demon Prince and Shaggoth) are now extremely light and easy to put together. So much so that you could simply glue all the parts without pinning (though I probably still would just to be 100% cautious).


The Review

Anyway, as I mentioned, I decided to pick up one of the new Finecast figures to do some experimenting on. In the end I settled on the Dark Eldar Archon.


The first thing I will say is that I was impressed by the relative lack of flash on the sprues for the figure. Earlier in the week there was some serious "scare mongering" going on following a blog post on an early opening of the Grey Knight character Draigo which seemed to have a lot of excess flash and generate a lot of negative comments.

I looked at a couple of the Draigo blisters in store and a few did seem to have more flash than other kits, but I guess the advice is to look at what you are buying to make sure you get a good cast before you put your money down. I expect the casting quality to get much better now that the big push to get a worldwide release out has passed.


As you can see from the pics, the amount of flash on this particular figure is insignificant - a couple of thin filmy bits but nothing a quick trim wouldn't easily remove and certainly much quicker to clean than metal flash.

This figure comes on two small sprues, one for the body and right arm and one for the head options, shoulder spike and weapon arm.


The detail on both sprues has come out perfectly - no evidence of tearing, warping or air bubbles/detail not filling. The mould lines are also very small which is always welcome. I had seen some people commenting on forums that the Finecast range requires more vents to be cut in the mould, meaning more contact points for flash which would obscure details.


Honestly, on this model I don't see what all the panic was about. The flash is no more than was ever present on a metal model (excluding the spure of course) and the contact points between sprue and figure are very small and do not meet at any detail points.

Like all models, whether metal, resin or plastic, I think I will still be sanding most surfaces to get as smooth a finish as possible, but for the casual painter and those who game, I really think the Finecast range will be welcomed as an improvement over metal miniatures.

I know that personally, I am really looking forward to being able to use some new and existing sculpts for conversions and have already been eyeing up the current Citadel Finecast releases, identifying models with interesting "new" conversion potential!

Feel free to leave your own thoughts in the comments.

Sunday, 22 May 2011

Suffer Not The Heretic - New Project


Bit of a teaser this blog post, but I've been working on something "new" (yes, I know...) that has been sparking my hobby muse.

I don't want to show too much yet (there are probably enough clues to get you thinking anyway!) so I'll leave you all with this picture:


Thursday, 28 April 2011

My Hobby Room


A bit of something different for this blog post.

A common topic on many hobby forums and something I always find pretty interesting is that of hobby spaces and hobby rooms. The little (or sometimes large!) sanctuaries we all have where we work away at what we love.

When I lived with my parents and family I never had a permanent hobby space that I could set up and leave projects for "hobby fermentation" (the creative kind, not the smelly, foosty kind!). I always looked on at threads where forumers posted their glorious hobby spaces with envy, aspiring to one day have my own full time space for modelling and painting.

Now that I'm older and have my own place with my long-suffering girlfriend, for the last 2 years I finally have a hobby place to call my own and here's some pics to prove it! (and because I don't think I've shared "my setup" before here):


My desk, complete with paint ranks (could use a couple more to be fair!), hobby mat, spray booth, manequins, lamps (with day light bulbs), a pretty view along the river and plenty of drawers and storage for bits and pieces!


A rather empty miniatures cabinet - because everyone needs somewhere to keep their work and still be able to see it for inspiration and to measure progress agaisnt.


The drawers beneath my desk, full of all manner of hobby tools and materials, along with the numerous boxes of models and parts that have started to accumulate here.


Finally, the model cupboard (well, one side of!), each white drawer is full of boxes or sprues of miniatures (because you can never have too many...!).

Thanks to the Royal Wedding tomorrow, I'll have a rare opportunity to spend some extra time in here working on some of the recent projects I've shared so hopefully I'll have something to show from these over the weekend.

Sunday, 24 April 2011

Why I Hate Metal Mini's + On The Workbench


I hate metal miniatures. There is nothing more frustratingly time consuming than preparing a metal miniature for painting.

With resin and plastic you can remove mould lines, flash and imperfections relatively quickly with a scalpel and files/sand paper. With metals though, it not only takes much longer to remove these, since the material is much stronger and more brittle, but you also have to put up with pitting on almost all surfaces.

Yes, sometimes resin miniatures get spots where the finish is a little rough and pitted, but with metals it tends to be all over the figure. Very annoying!

There is a couple of ways to deal with this:


Sanding

Sanding pitted and rough surfaces with fine grit wet/dry paper (starting with 800 and finishing with 1000+) is a good starting point for cleaning up the surfaces of a metal miniature. For tighter nooks and crannies, you can cut small strips and glue them to pieces of wire or cocktail sticks to get in at them.

However, sanding will only go so far to clean up a metal miniature. Often the pitting involves both raised bumps and recesses, so unless you want to spend forever sanding a couple of mm off the entire model, you are going to need to do some filling too...


Milliput


Milliput is a two part epoxy putty that is water soluble, meaning it can be diluted to create a milky solution that can be applied with a brush and used to fill small recesses. Larger mould shift line recesses can also be filled with it as, while still fresh, it can be worked into shape and smoothed flush with the mini. It can then be filed to a smooth finish once cured. The only downfall is that it takes a couple of hours to fully cure and can take a while to ensure all gaps have been filled flush.


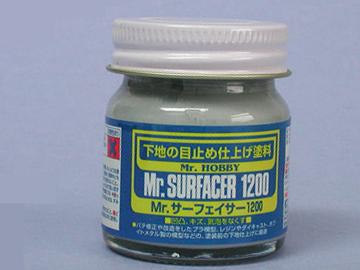
Mr Surfacer

Mr Surfacer comes as a grey liquid in a jar which cures in about 15 minutes to a plastic like finish. It can be applied neat from the jar to fill bigger gaps, or thinned (using Mr Colour Thinner) to create a more fluid mixture which can be painted on to fill smaller, shallower recesses. Mr Surfacer (1000 or 1200) can also be thinned and used as a primer through an airbrush, leaving a smooth finish.


One of the main benefits of this product is that no sanding is necessary on the finish as it is self levelling. Of course, if you aren't covering the entire surface, you will likely still have a small seam where the edge of the dried Mr Surfacer meets the metal surface of the model. In these instances, some light sanding with wet dry will be all that's needed.


On the Workbench

Why this outburst of hatred towards metal miniatures? Well, recently I decided to start working on an Inquisitor scale Eversor Assassin miniature from Games Workshop which I've had lying around since last year.


A nice sculpt, though with a horrendous amount of mould lines, mould shift, flash and pitting. The armour plating in particular required a lot of work to get it back to it's smooth shapes and hard edges. I also chose to remove all of the protruding injector type things from the armour plates. Partly to allow me to get them smooth and in shape again, partly because they were badly cast and would have required a lot of work to get back to their intended state and partly because I just think it looks cooler and more fitting of a sleek, deadly assassin.

All in all, I've spent about 3 days on and off just cleaning this miniature up and re-sculpting, detailing and filling areas to get it ready for paint.

Urgh!

Sunday, 27 March 2011

First and Only (Part III)


It's been a little quiet on the blog front over the last 3 weeks or so but I have found snatches of time here and there to progress this project. I'm finally at the end of the sculpting and converting stage (excluding a little bit of gluing) so painting and work on the base is up next.


The arm holding the weapon and the cape were probably two of the things I was kind of dreading having to do, but in the end they were actually a lot of fun to do and turned out quite well.

All in all I am very pleased with how he has turned out and I'm looking forward to slapping some paint on him. I've learned a lot during the converting and sculpting process on this figure, including finding a putty mix that I am really enjoying working with - hopefully this will carry over onto future figures too.

Feel free to let me know what you think, or any questions in the comments below.

Sunday, 13 March 2011

Crystal Brush 2011 Awards - Jakob Rune Nielsen


Today's blog post is something a little bit different.


The Crystal Brush

Last year, CoolMiniOrNot.com announced that it would be organising a special painting competition, the Crystal Brush Awards, to take place at AdeptiCon 2011. With a $10,000 top prize and $2,000 and $1,000 respectively for 2nd and 3rd place, this is certainly the most valuable prize of any miniature painting competition I know of.

The competition is also a little special because of the way in which judging is handled. In addition to judging, which will take place at Adepticon in Chicago by a panel of experts including the legendary Mike McVey, the other 50% of the final scores will be determined by internet voting on the CoolMiniOrNot website.

Without getting in to discussion about the judging system (of which, personally, I am not a fan), it certainly makes things interesting in the run up. For a change, entrants are actively promoting their work in progress on entries in order to generate public interest which could pay dividends come the online voting.


Jakob Rune Nielsen

One entrant in particular, who's work I have long admired, is Jakob Rune Nielsen. I have been fortunate enough to be privy to the entire development process of Jakobs entry and I have to say, it is quite simply one of the most captivatingly unusual miniatures I have seen - embodying a great blend of John Blanche-esque "Gothic Sci-Fi", with Jakobs own creative abilities.

In the interest of helping a friend out therefore, I thought I would share with you a couple of pics of Jakob's progress and point you in the direction of his wonderful website (which, if you haven't already seen, you really should!):


Jakob has begun to share his WIP progress photo's on his website on a regular basis now, so if you want to follow the development progress, check it out. Having seen the final piece and painting begin, I can promise you, it is well worth following!

Sunday, 27 February 2011

First and Only (Part II)


Since my original post on this I have spent a fair amount of time doing some research and amassing parts and ideas which have begun to find there way into my initial test model (shaping up to be Tanith scout Bonin) seen below.

As I wanted to keep my guardsmen to a realistic scale and proportions I've used Elysian guardsmen legs (from Forgeworld) as a base and sculpted the torso, neck and arms on top since there is a lack of pieces in the GW and Forgeworld ranges that fit with the look I'm going for for these. I have also removed the kneepads, thigh padding and harness straps from the legs and replaced them with a look more fitting with the Adrian Smith artwork I am using for inspiration.

There are still a lot of details to add, and this is obviously still very WIP, but I figured I would share it since I feel it is a sizeable step forward in the progress. Incase you are wondering about the pose - he's going to be moving silently to the edge of the wall he has his back to, weapon raised in his left arm ready to break cover and bring down the enemies of the Imperium.


More soon! Feel free to let me know what you think in the comments section.

Sunday, 6 February 2011

Captain Korvydae Finished


Finally got around to finishing this figure - first of the year! A nice sculpt but with a few headaches due to typical Forgeworld cast issues (though much improved over the quality from about 3 yeard ago!). The jump pack in particular had a few ugly areas.


The other area I always find a little frustrating is the round metal dimples on the jump pack - painting metal over white is always an issue!


The paintjob is a bit predictable being fairly similar to the one on the Forgeworld site with the exception of the fully gold hammer and the gold raven on the jump pack top. I felt that it was important to emphasise his captain status with plenty of bling.


The base was a bit of an after-thought on this figure as I really just wanted to get him finish. It turned out ok, but there are areas I think could be improved. Still, I think the sand/dirt colour contrasts the armour quite nicely.


I spent the afternoon doing some early work on the first test model for the upcoming Tanith project too. I've settled on putting together (at least some) of the Gereon mission team.

More on this soon...